Mixed Kreations

The Creative Life & Journey Of A DIY'ER

  • Home
  • Diy Projects
    • Handmade Cross Projects
    • Holiday & Seasonal Projects
    • Mason Jars
    • Fun Upcyled Shutters & Spindles
    • Texas Projects
    • Upcycled Cans
    • Wood Projects
    • Jewelry Tutorials
  • Quick and Easy Recipes
  • Shop Mixed Kreations
    • Etsy Shop
    • Mixed Kreations Amazon Influencer
  • DISCLOSURES STATEMENT & PRIVACY POLICY
  • About Me
  • Recommendations
You are here: Home / DIY/Craft Projects / DIY Faux Leather Cross With Wings

DIY Faux Leather Cross With Wings

April 27, 2013 By: Linda @ Mixed Kreations8 Comments

If you enjoyed this post, don't forget to pin it for later!

61 shares
  • Share
  • Tweet

This Diy Faux Leather Cross With Wings was a special order that I received. I was asked to paint the larger cross so that it would resemble leather

Handcrafted Cross with Angel Wings

Diy Faux Leather Cross

I never having painted anything to look like leather before, so for my Diy Faux Leather Cross, I of course turned to my good friend Google, LOL. You can find out how to do just about anything on Google.

Items I bought for this project

How to make a Faux Leather Cross With Wings #diy #cross #MixedKreations
Powered By the Tweet This Plugin
Tweet This

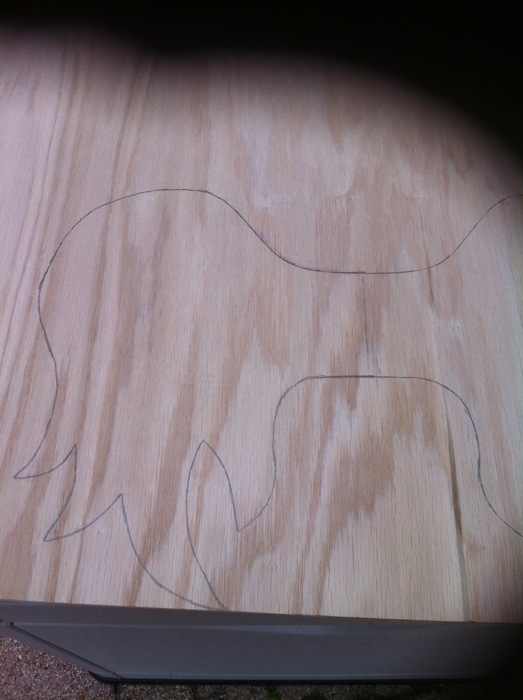
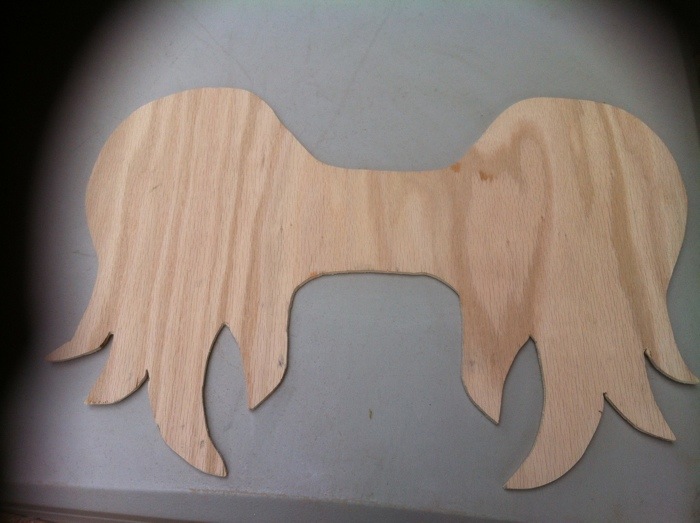
First draw the wings on a piece of plywood. Cut out, and sand.

Drawing the angel wings

I forgot to take this picture, but now paint the wings with antique white. Need to coats to cover. Let dry thoroughly between each coat. Then float burnt umber around the edges. Once dry sand the edges to give it a rustic worn look.

Gut out and sand the angel wings

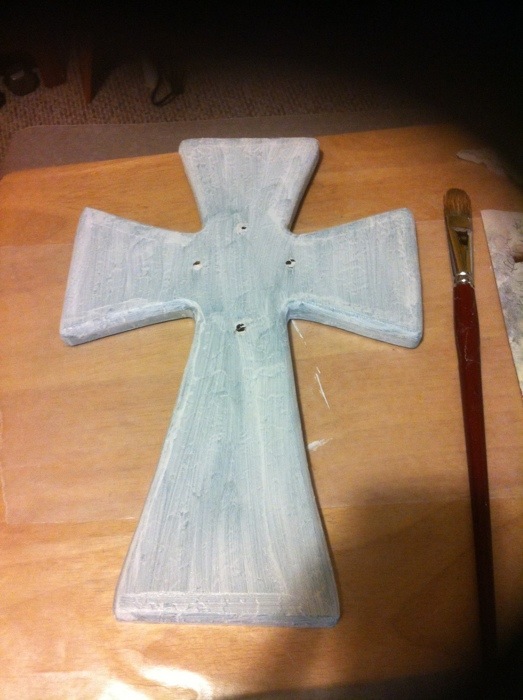
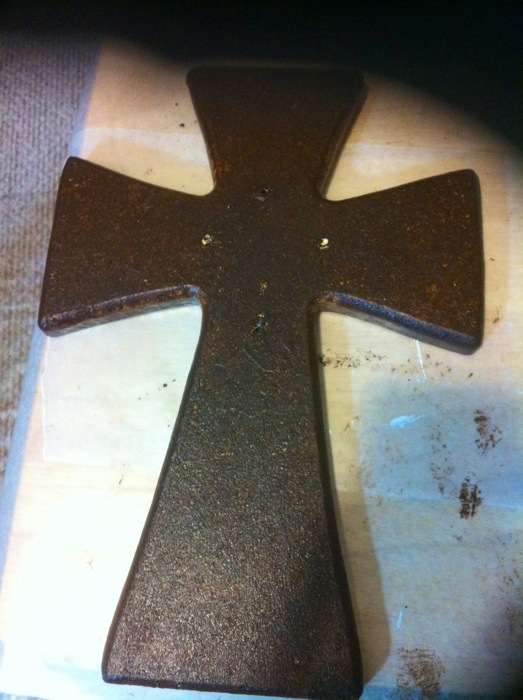
Prime the large cross with gesso.

First primer the cross with gesso

Let primer dry thoroughly
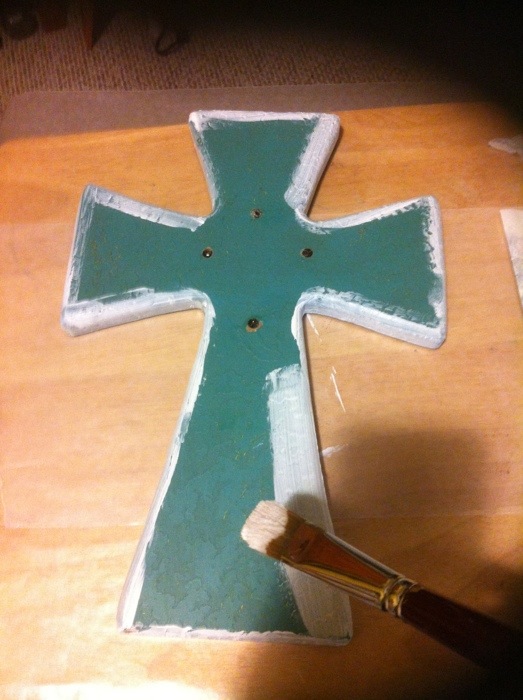
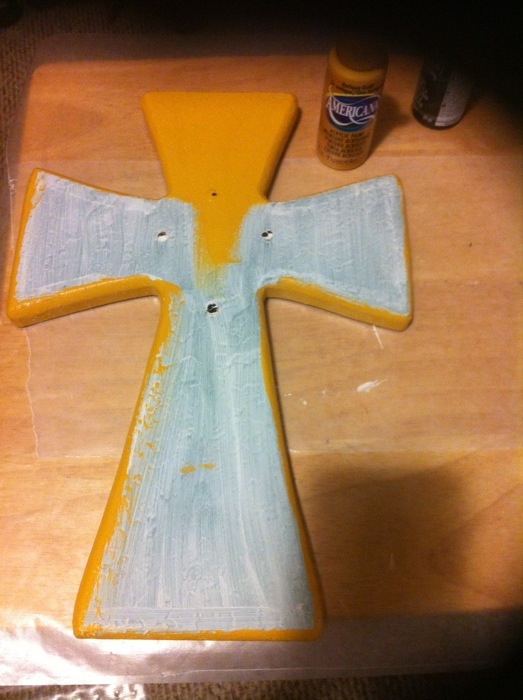
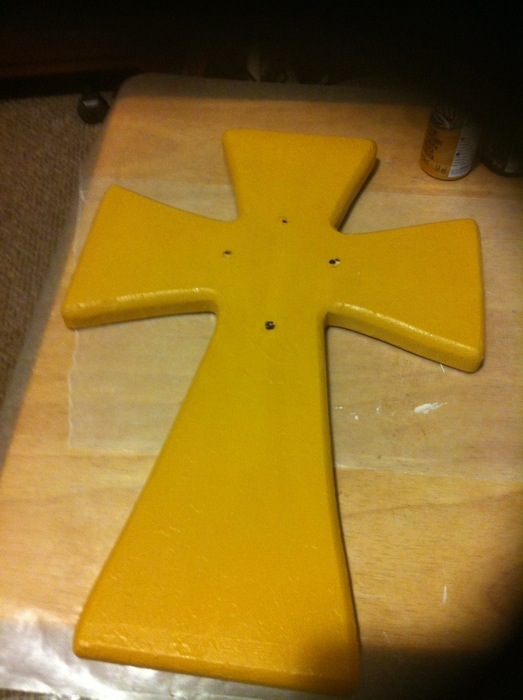
Apply the antique gold for the undercoating of the painted leather technique.

 Using antique gold for the leather undercoat

Let the undercoat dry thoroughly

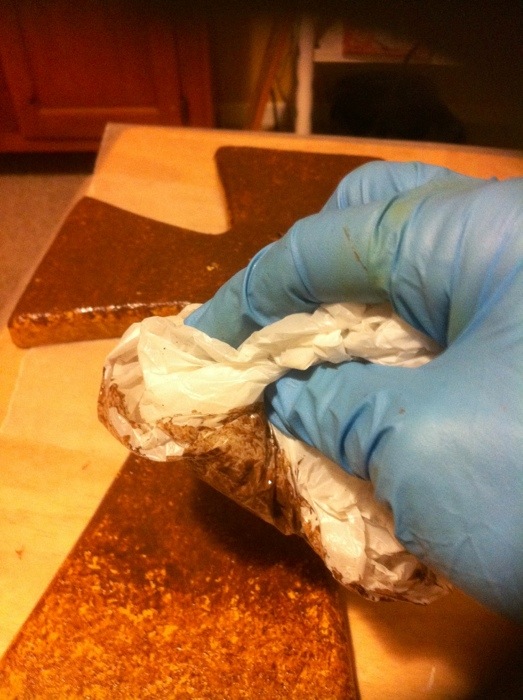
Mix up a small portion of Mod Podge (1 part) and burnt umber (2 parts). Mix well. Now grab one of the plastic bags and dip into the mixture and start dabbing onto your cross. Continue until you have the cross coated. Then turn your bag inside out for a clean part, and go back over it while it’s still wet, dabbing to remove any excessive paint.

Dab Burnt umber paint on with a plastic bag

Leather painting technique Let dry thoroughly

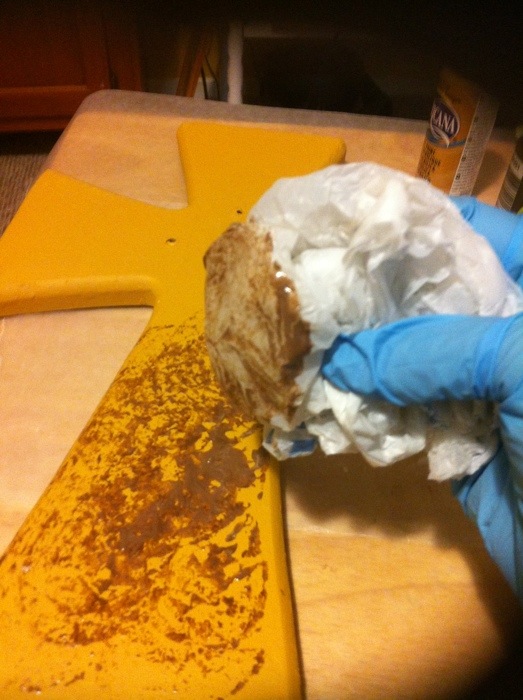
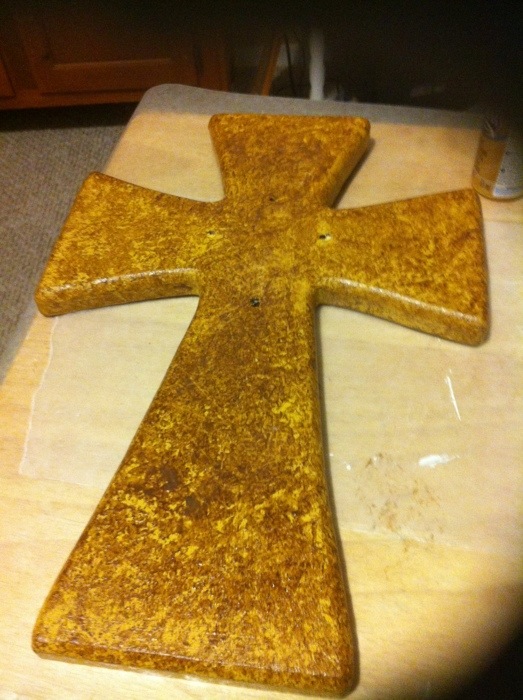
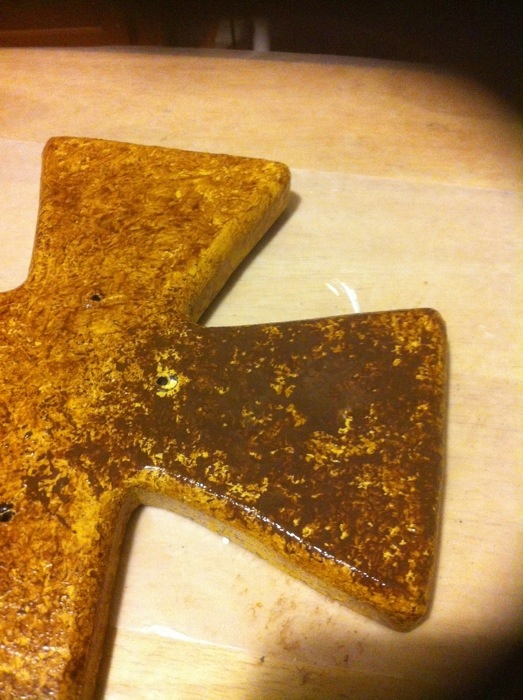
Once dry mix up another small portion of Mod Podge, and burnt umber. This time using less Mod Podge, and a little more burnt umber. Get a clean plastic bag and repeat the process above until covered. Let dry, and if needed apply another coat. The less Mod Podge, and more burnt umber used will make the cross darker. But you do need some Mod Podge for the glaze.

Trying out a new paint technique, faux leather cross with wings. #diy #cross #MixedKreaitons
Powered By the Tweet This Plugin
Tweet This

Painting cross to resemble leather

Once you get the cross how you want it, and its dry. Mark off where you want the decorative tacks, and then drill small holes to get the tacks started, so not to split your cross when you hammer them in.

Handpainted cross that resembles leather

Now it’s time to assemble your cross with wings using gorilla glue, and it only takes a little bit, because it swells up (found that out the hard way). I did nothing to the little cross; I liked it just the way it was.

handmade cross with wings
diy faux leather cross

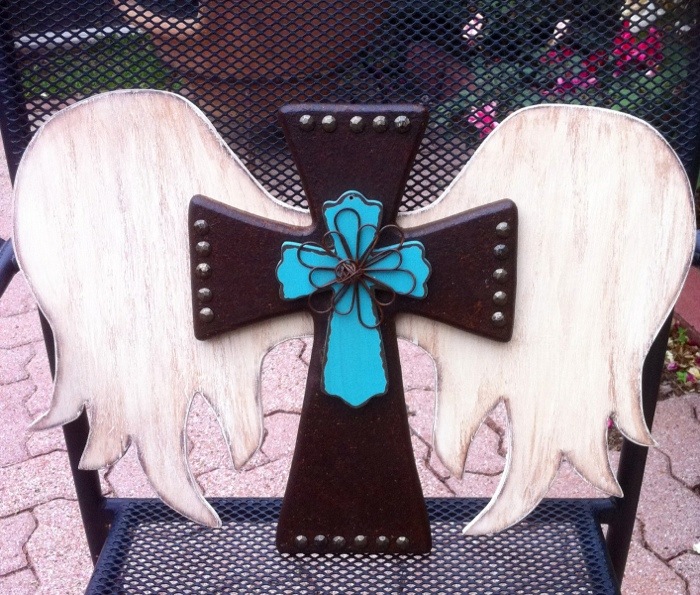
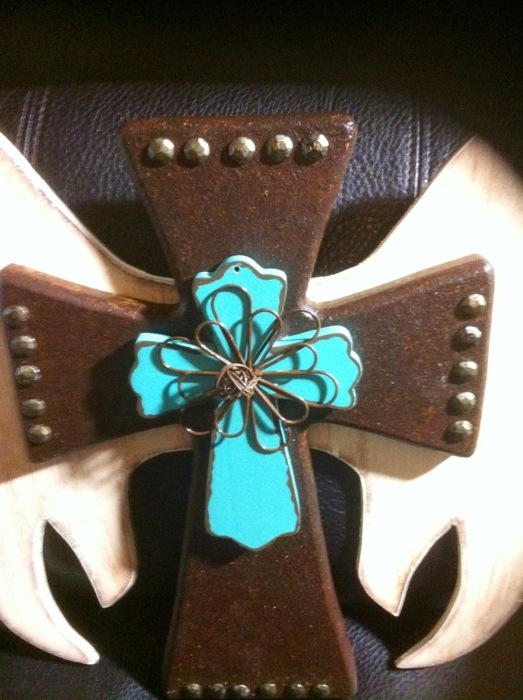
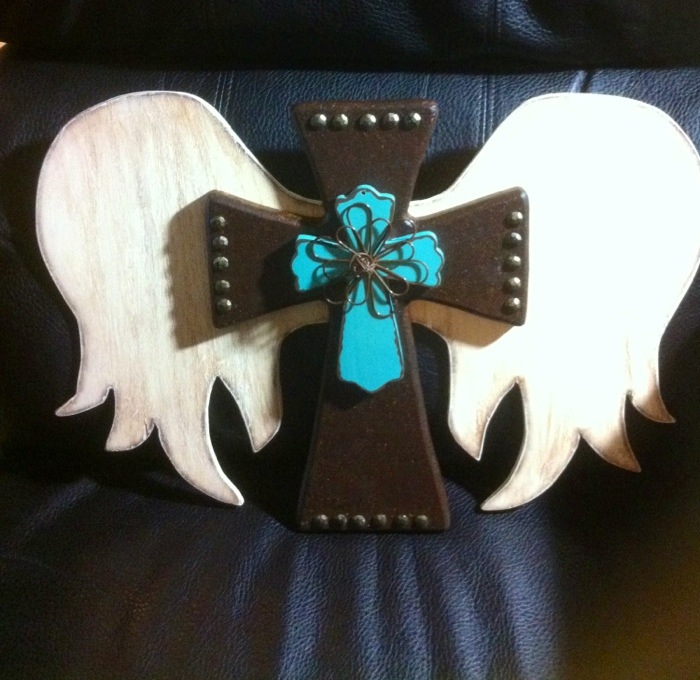
Here is the cross sitting in my leather chair. I thought that I was getting it darker then it actually turned out, but I am still happy with how it looks.

How do you like my faux leather cross with wings? Have you ever painted anything on wood to resemble leather? If so, I would really like to see how your’s turned out.

***This post contains affiliate links, if you click on an affiliate link & buy something I may receive a small commission at no extra charge to you. The affiliate money I earn helps pay the expenses to keep this site running. Please read my full advertising disclosure for more info. Thanks so much for your support!***

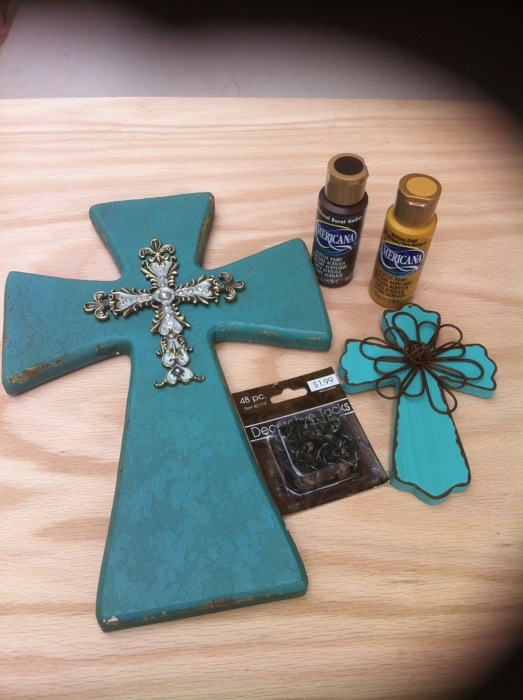
Supplies Needed For My Diy Faux Leather Cross

Large cross
Small cross
Wings cut from plywood
Gesso
Antique gold acrylic paint
Burnt umber acrylic paint
Antique white acrylic paint
Mod Podge(affiliate) Great stuff!
Paint brush
Couple plastic grocery bags
Decorative tacks(affiliate) These are similar to the ones I used.
Gorilla glue
Skill saw
Drill
Sandpaper
Hammer

More Paint Technique’s You May Enjoy

Faux Galvanized Metal Letters
Faux Leather Cross With Wings
Faux Sea Glass
Homemade Chalk Paint

If you enjoyed this post, don't forget to pin it for later!

61 shares
  • Share
  • Tweet

If you enjoyed this post, would you mind taking the time to:
  • Share, or Pin for later reference.
  • Follow me on Facebook, Twitter, Pinterest
  • Leave a comment
Thank you so much for taking the time to comment. I love hearing from my readers, and appreciate the kind words.

Comments

  1. Nikki Frank-Hamilton says

    March 7, 2016 at 8:50 pm

    Linda, you did a great job, it really looks like leather, and the nailhead trim is really cool. I’m glad you left the last heart as is, I really like the pop of blue and the wire trim. This turned out so pretty, I’m sure your client was extremely happy! I would be!

    Reply
    • Linda @ Mixed Kreations says

      March 9, 2016 at 4:04 am

      Thank you Nikki! I looked up some technique’s on my friend Google (-; Then tried some out and it worked. I love the blue on the other heart as well, and my client loved it.

      Reply
  2. michelle says

    December 18, 2016 at 4:10 am

    Your cross is beautiful Linda and the technique looks amazing. I’m definitely going to have to give it a try. I love the texture you’ve created with the plastic bag and Mod Podge, it really adds to the leather look and feel.

    Reply
    • Linda @ Mixed Kreations says

      December 21, 2016 at 6:04 pm

      Thank you Michelle! This technique is so easy, and it really does resemble the look of leather.

      Reply

Trackbacks

  1. Turquoise Wood Cross Tutorial says:
    February 9, 2015 at 10:35 am

    […] I painted my wood base with the faux leather look. […]

    Reply
  2. Wooden Box Gets New Look says:
    February 9, 2015 at 10:36 am

    […] I had a package of wood crosses that I had picked up once at the craft store, thinking that they would come in handy sometime. So I painted two of them a golden yellow, then sponged on some burnt umber to give it the look of leather, like I did on my cross with wings tutorial. […]

    Reply
  3. Cutting Board Faux Clock says:
    May 13, 2015 at 6:31 am

    […] Here is my first faux clock that I made out of one of my thrift store […]

    Reply
  4. Turquoise Wood Cross Tutorial - Mixed Kreations says:
    May 12, 2016 at 7:00 am

    […] I made this turquoise wood cross out of a solid wood post so it is very sturdy. The cross can be made and then decorated however you like to fit in with your own home decor. This tutorial will show you how to connect the pieces together to for this sturdy wood cross. […]

    Reply

Leave a Reply Cancel reply

Your email address will not be published. Required fields are marked *

CommentLuv badgeShow more posts

This site uses Akismet to reduce spam. Learn how your comment data is processed.

Thanks for sharing your thoughts and comments! I read and appreciate every single one!

Follow Mixed Kreations

Facebooktwitterpinterestyoutubeinstagram

My Favorites on Amazon

My Amazon Influencer Shop

Homemade Chalk Paint

diy chalk paint

How to Make Rusty Cans

how to make rusty cans

How to Make a Flag From a Wood Shutter

how to make a 2 sided american flag

Easter Egg Jar

How to make a Easter egg jar

Diy Texas Tile Coasters

Texas Tile Coasters

Update a Thrift Store Find

How to Update a Hanging Box in 4 easy steps

Categories

By Kelli & Crystal From Learn To Blog Hangouts

#LearntoBlog Hangouts

Dominate Course

LearntoBlog
Featured on Hometalk.com
Rakuten Affiliate Network Welcome Program
Grow and Make

Dollar Tree

Creative Fabrica Font Bundles

Font Banner - Free Fonts

Featured At

Featured At

Mixed Kreations featured in Country sampler

Featured at

mixed kreations is featured in Bella Crafts online magazine
The Pin Junkie

Canva Photo Editing

Amazon Affiliates

I am a participant in the Amazon Services LLC Associates Program, an affiliate advertising program designed to provide a means for sites to earn advertising fees by advertising and linking to Amazon.com.

Disclosures Statement

This policy is valid from 19 July 2013 This blog is a personal blog written and edited by me. For questions about this blog, please contact Linda @ ldkeesee@mixedkreations.com. This blog accepts forms of cash advertising, sponsorship, paid insertions or other forms of compensation. The compensation received will never influence the content, topics or posts made in this blog. All advertising is in the form of advertisements generated by a third party ad network. Those advertisements will be identified as paid advertisements. The owner(s) of this blog is compensated to provide opinion on products, services, websites and various other topics. Even though the owner(s) of this blog receives compensation for our posts or advertisements, we always give our honest opinions, findings, beliefs, or experiences on those topics or products. The views and opinions expressed on this blog are purely the bloggers' own. Any product claim, statistic, quote or other representation about a product or service should be verified with the manufacturer, provider or party in question. This blog does not contain any content which might present a conflict of interest. To get your own policy, go to http://www.disclosurepolicy.org

Copyright © 2023 · Modern Blogger Pro Theme By, Pretty Darn Cute Design