Mixed Kreations

The Creative Life & Journey Of A DIY'ER

  • Home
  • Diy Projects
    • Handmade Cross Projects
    • Holiday & Seasonal Projects
    • Mason Jars
    • Fun Upcyled Shutters & Spindles
    • Texas Projects
    • Upcycled Cans
    • Wood Projects
    • Jewelry Tutorials
  • Quick and Easy Recipes
  • Shop Mixed Kreations
    • Etsy Shop
    • Mixed Kreations Amazon Influencer
  • DISCLOSURES STATEMENT & PRIVACY POLICY
  • About Me
  • Recommendations
You are here: Home / Blogging & Business Tips / How To Take A Computer Screen Shot

How To Take A Computer Screen Shot

February 17, 2016 By: Linda @ Mixed Kreations8 Comments

If you enjoyed this post, don't forget to pin it for later!

2 shares
  • Share
  • Tweet

how to take a computer screen shot
Do you ever need to take a computer screen shot when making a tutorial, or maybe just need to copy a screen to refer back to, for one thing or another?

How To Take A Computer Screen Shot #tutorial
Powered By the Tweet This Plugin
Tweet This

To Take A Computer Screen Shot

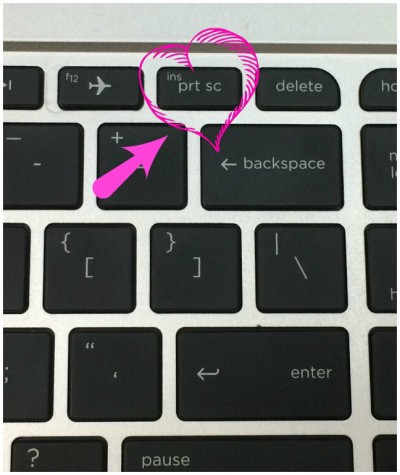
Press the “prt sc” button just to the right of the F key’s at the top right side of your computer keyboard.

computer screen shot

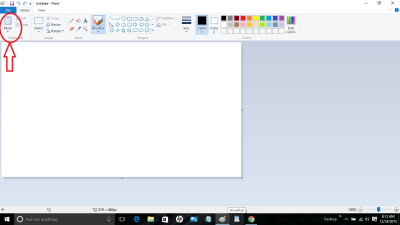
Then open your Word or Paint program on your computer, and paste by clicking on the paste clipboard in the upper left corner of your paint program. I am using Paint so I can easily add circles, arrows, etc. to help walk you through this tutorial.

paste screen shot

Once you paste it too your clipboard it will show up in the box.

screen shot

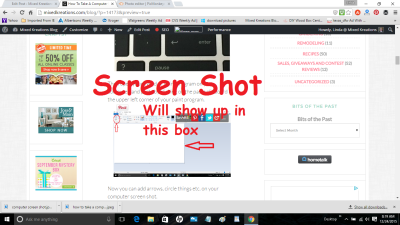
Now you can add arrows, circles, lettering, etc. to your computer screen shot (I use my paint program). This comes in really handy for making tutorials for different things on the computer, like this tutorial.

If you found this post helpful, Please Share!

*This post contains affiliate links, if you click on an affiliate link & buy something I may receive a small commission at no extra charge to you. The affiliate money I earn helps pay the expenses to keep this site running. Please read my disclosure for more info. Thanks so much for your support!*

If you enjoyed this post, don't forget to pin it for later!

2 shares
  • Share
  • Tweet

If you enjoyed this post, would you mind taking the time to:
  • Share, or Pin for later reference.
  • Follow me on Facebook, Twitter, Pinterest
  • Leave a comment
Thank you so much for taking the time to comment. I love hearing from my readers, and appreciate the kind words.

Comments

  1. Lori Schumaker says

    February 17, 2016 at 2:36 pm

    Hi Linda, I was just trying to figure out how to do this last week! I googled for awhile and what I found didn’t work, so I used the snipping tool instead! Now I know how to do it the correct way from you! Thank you!
    Lori Schumaker recently posted…11 True Stories of Redeeming Love: When You Need More Than the World Can GiveMy Profile

    Reply
    • Linda @ Mixed Kreations says

      February 17, 2016 at 5:31 pm

      Hi Lori! I did the same thing a while back I googled trying to find how, it took me a while but I finally did it. So I figured that would probably make a good tutorial because I’m sure I’m not the only one that would like to know how. Glad I made it. Thanks for stopping by!

      Reply
  2. Mary-the boondocks blog says

    February 18, 2016 at 2:41 pm

    This is such a helpful thing to know. My girls taught me how to do this, And then I forgot so they had to teach me again… and again. I’m not the most tech savvy person. But I think I’ve got it now. Thanks for reminding me… before I forget again.
    Mary-the boondocks blog recently posted…Sweater pillows the Easy Way – Μαξιλάρια απο Πουλόβερ με Εύκολο ΤρόποMy Profile

    Reply
    • Linda @ Mixed Kreations says

      February 18, 2016 at 3:23 pm

      Thanks Mary! A while back I was trying to figure out how to make a screen shot so I had to Google it and try several different tutorials until I found one that worked. Then I thought Hmmm I’m sure I’m not the only one that wants to take screen shots, LOL. So I created this tutorial. (-; Another reason I created it was, so I would always have it handy.

      Reply
  3. carol says

    February 20, 2016 at 9:44 pm

    Thanks for the tips on this subject.
    carol recently posted…12 Lawn Care TipsMy Profile

    Reply
    • Linda @ Mixed Kreations says

      February 21, 2016 at 2:31 am

      I thought maybe their were others out there they may want to take screen shot and not know how. Thanks for stopping by!

      Reply
  4. Nikki Frank-Hamilton says

    February 22, 2016 at 6:25 pm

    Linda, this is a tool that I use often especially when I am putting together a tutorial or a step by step document. The first time I wanted to do it I asked my husband and he walked me through it, and then I forgot, so I asked again, and again. The fourth and fifth times I asked my son and he walked me through it, now I have your tutorial saved so hopefully I won’t have to ask them again! Lol thank you.
    Nikki Frank-Hamilton recently posted…Choose light. Choose Love. Lots of Love.My Profile

    Reply
    • Linda @ Mixed Kreations says

      February 23, 2016 at 3:26 pm

      Hi Nikki! That’s one reason why I made the tutorial so I would have it on hand when I forget. And I’m sure I will again, LOL. I had to google how to take a screen shot and try several different ones before I found one that worked. Screen shots really come in handy, can’t believe I haven’t tried it a long time ago.

      Reply

Leave a Reply Cancel reply

Your email address will not be published. Required fields are marked *

CommentLuv badgeShow more posts

This site uses Akismet to reduce spam. Learn how your comment data is processed.

Thanks for sharing your thoughts and comments! I read and appreciate every single one!

Follow Mixed Kreations

Facebooktwitterpinterestyoutubeinstagram

My Favorites on Amazon

My Amazon Influencer Shop

Homemade Chalk Paint

diy chalk paint

How to Make Rusty Cans

how to make rusty cans

How to Make a Flag From a Wood Shutter

how to make a 2 sided american flag

Easter Egg Jar

How to make a Easter egg jar

Diy Texas Tile Coasters

Texas Tile Coasters

Update a Thrift Store Find

How to Update a Hanging Box in 4 easy steps

Categories

By Kelli & Crystal From Learn To Blog Hangouts

#LearntoBlog Hangouts

Dominate Course

LearntoBlog
Featured on Hometalk.com
Rakuten Affiliate Network Welcome Program
Grow and Make

Dollar Tree

Creative Fabrica Font Bundles

Font Banner - Free Fonts

Featured At

Featured At

Mixed Kreations featured in Country sampler

Featured at

mixed kreations is featured in Bella Crafts online magazine
The Pin Junkie

Canva Photo Editing

Amazon Affiliates

I am a participant in the Amazon Services LLC Associates Program, an affiliate advertising program designed to provide a means for sites to earn advertising fees by advertising and linking to Amazon.com.

Disclosures Statement

This policy is valid from 19 July 2013 This blog is a personal blog written and edited by me. For questions about this blog, please contact Linda @ ldkeesee@mixedkreations.com. This blog accepts forms of cash advertising, sponsorship, paid insertions or other forms of compensation. The compensation received will never influence the content, topics or posts made in this blog. All advertising is in the form of advertisements generated by a third party ad network. Those advertisements will be identified as paid advertisements. The owner(s) of this blog is compensated to provide opinion on products, services, websites and various other topics. Even though the owner(s) of this blog receives compensation for our posts or advertisements, we always give our honest opinions, findings, beliefs, or experiences on those topics or products. The views and opinions expressed on this blog are purely the bloggers' own. Any product claim, statistic, quote or other representation about a product or service should be verified with the manufacturer, provider or party in question. This blog does not contain any content which might present a conflict of interest. To get your own policy, go to http://www.disclosurepolicy.org

Copyright © 2023 · Modern Blogger Pro Theme By, Pretty Darn Cute Design