Mixed Kreations

The Creative Life & Journey Of A DIY'ER

  • Home
  • Diy Projects
    • Handmade Cross Projects
    • Holiday & Seasonal Projects
    • Mason Jars
    • Fun Upcyled Shutters & Spindles
    • Texas Projects
    • Upcycled Cans
    • Wood Projects
    • Jewelry Tutorials
  • Quick and Easy Recipes
  • Shop Mixed Kreations
    • Etsy Shop
    • Mixed Kreations Amazon Influencer
  • DISCLOSURES STATEMENT & PRIVACY POLICY
  • About Me
  • Recommendations
You are here: Home / DIY/Craft Projects / repurposed/upcycled / How To Make Animal Print Switch Plate Covers

How To Make Animal Print Switch Plate Covers

September 19, 2016 By: Linda @ Mixed Kreations15 Comments

If you enjoyed this post, don't forget to pin it for later!

25 shares
  • Share5
  • Tweet

Here recently I have added some animal print switch plate covers to my guest bathroom. If you have just started to follow along you may have missed my repurposed wood chair turned shelf, and my shabby animal print valiance. That I had made for our guest bathroom with the safari animal print theme.

How To Make Animal Print Switch Plate Covers

leopard print switch covers

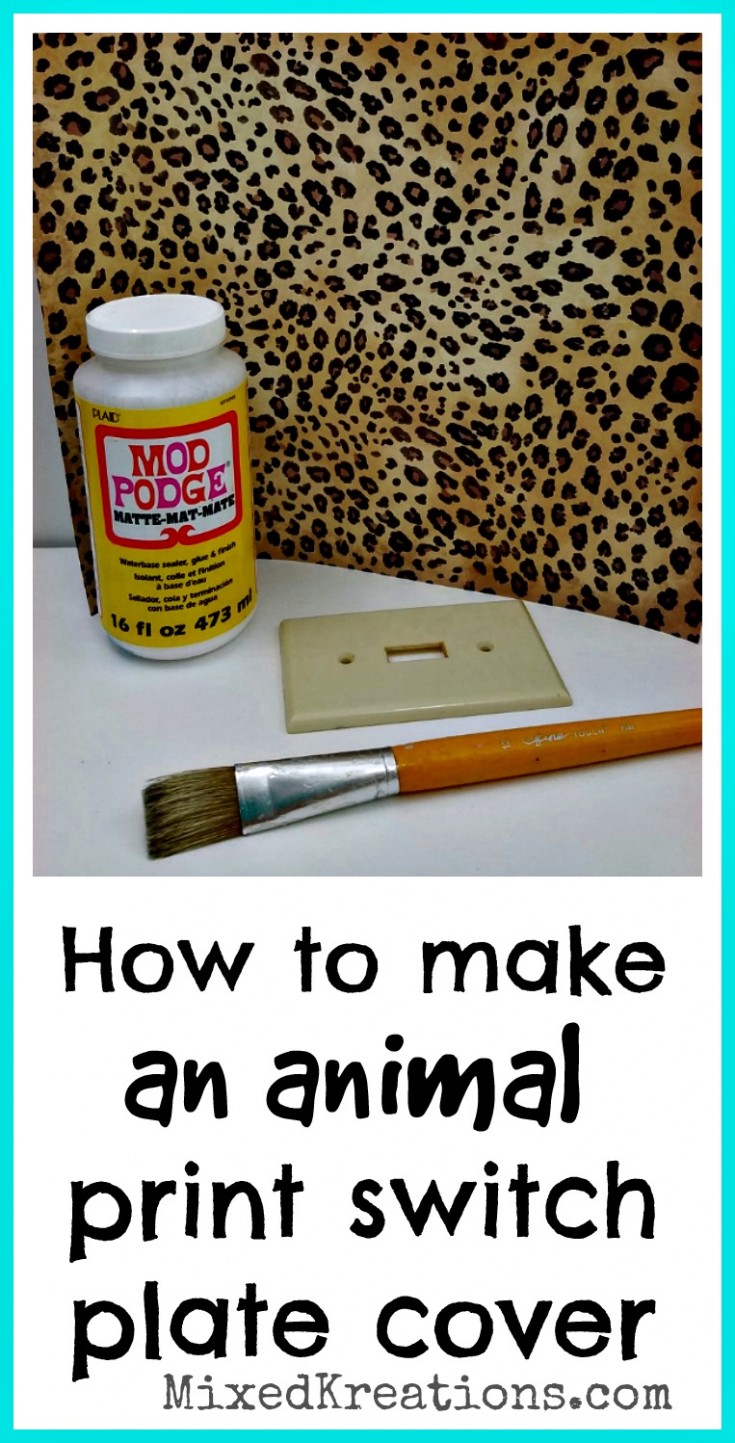
First you will need some switch plate covers. You can either buy some cheap one at Home Depot or even Walmart, or just remove the ones that are already covering your switches like I did.

Add some fun to a room with – animal print switch covers. #diy #AnimalPrint
Powered By the Tweet This Plugin
Tweet This

Animal print switch plate covers

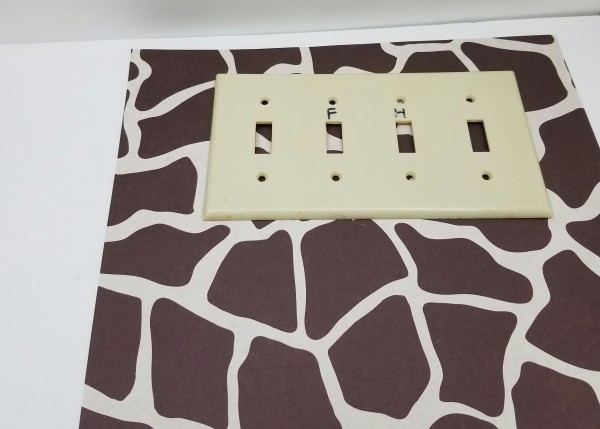
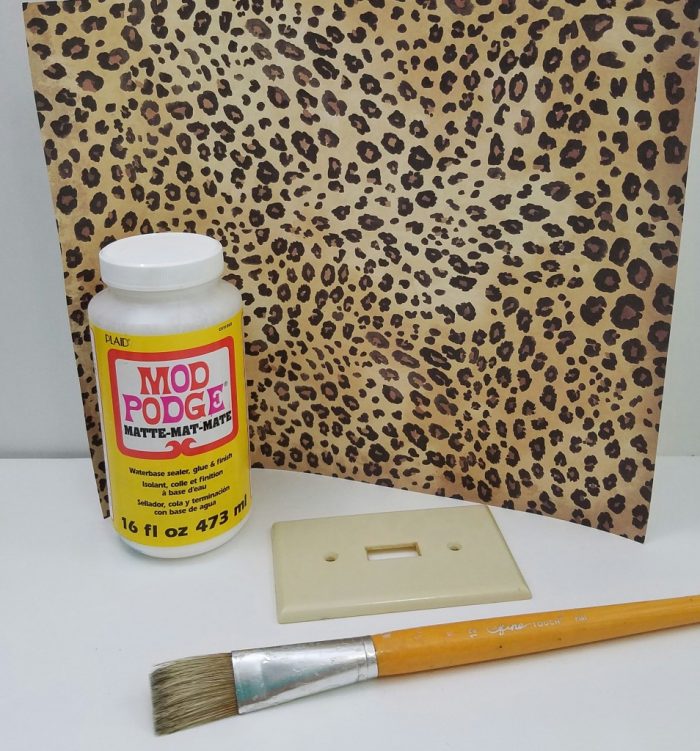
Choose the animal print scrapbook paper that you are going to use.

zebra print switch covers

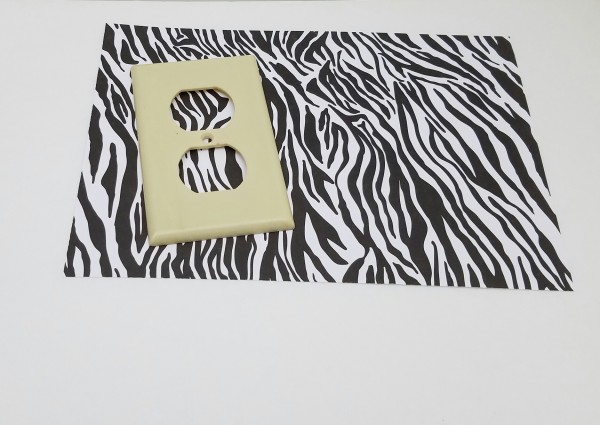
As you can see in the photo’s I have two switch plates that I am going to cover, and one electrical plug cover plate.

Animal print switch plate covers

Now cut your scrapbook paper just a little bit larger than the switch plate or plug cover that you are going to cover.

diy Animal print switch covers

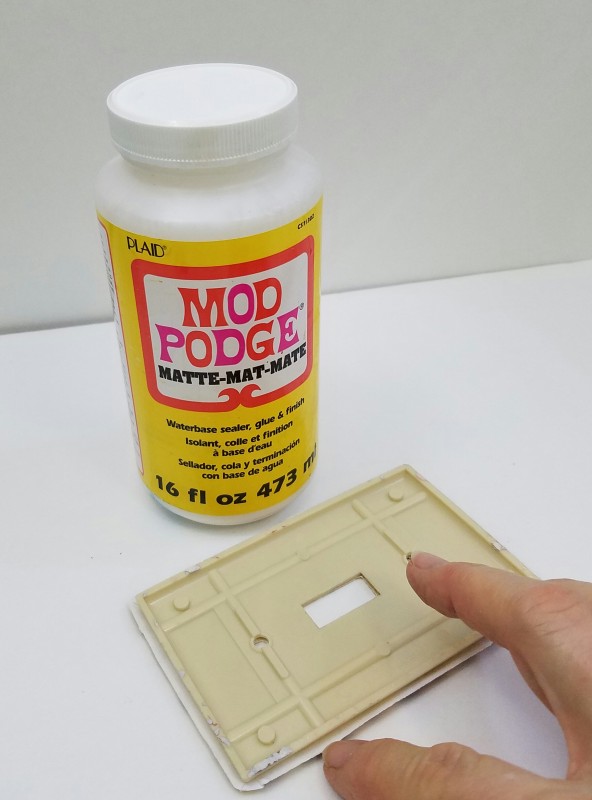
Using your paint brush add the mod podge to the top of your switch plate cover, do not paint the curved edges of the switch plate yet. Lay the scrapbook paper face down and the position your switch plate onto the paper. Let dry.

how to make Animal print switch covers

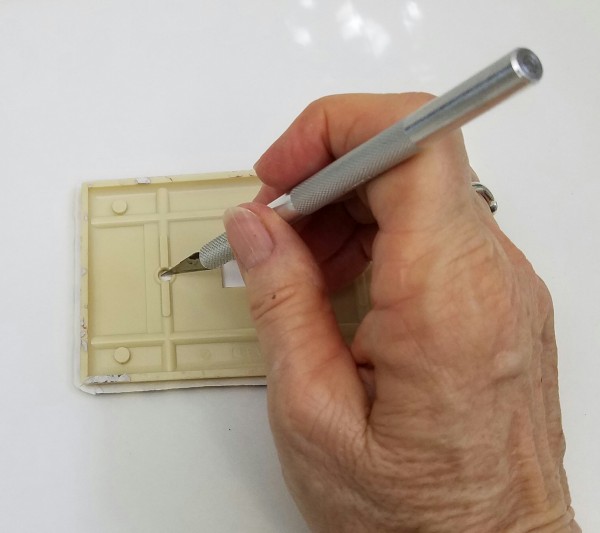
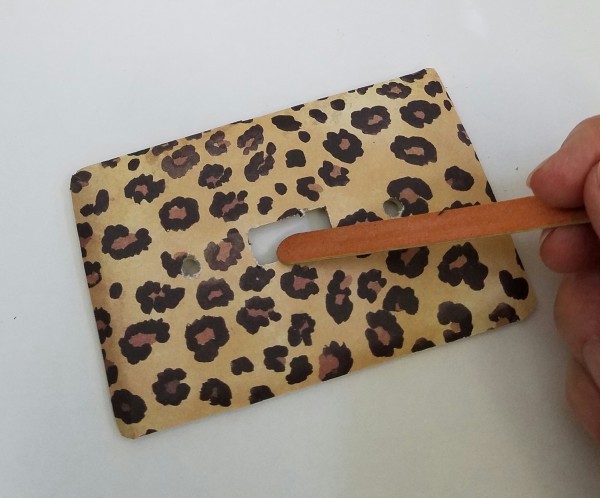
Taking your x-acto knife and using the cutting board to lay the switch plate on face down. Start cutting out the switch opening and the two small hole openings carefully.

how to make Animal print switch covers

This next step I seem to have forgotten to take the picture (probably because I didn’t have a third hand, LOL). But I will walk you through this step.

Looking at the photo below, take the switch plate and roll it up onto the edge so that the paper is flat on the cutting board. Keep it in this position while using the x-acto knife to trim off the extra scrapbook paper.

how to make a leopard print switch cover

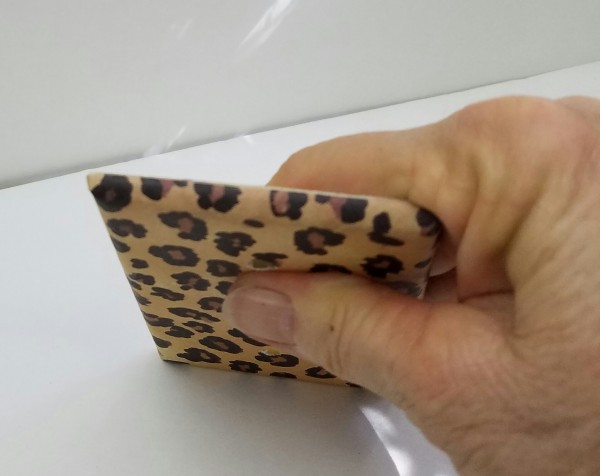
Go around and repeat on all sides, and do the same for the corners because they are rounded.

cut-corners-of-switch-plate

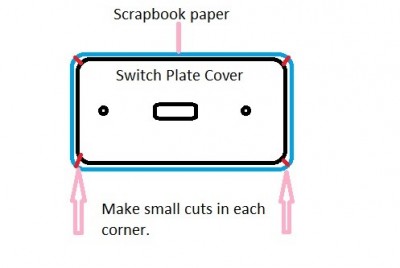
Looking at the example picture above made a small cut at each corner on the scrapbook paper. The small red lines are the cuts. This is to help the scrapbook paper lay flat once glued down.

how to make Animal print switch covers

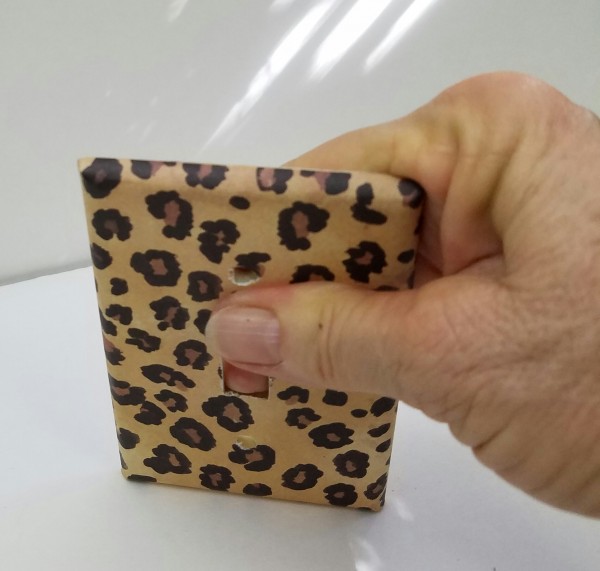
Now go around the edges adding mod podge then use the same rolling to the edge method to glue the edges down smoothly.

These diy animal print switch covers will bring a smile
Powered By the Tweet This Plugin
Tweet This

Animal print switch covers

Once the mod podge is dry go around and sand the edges with an emery board to remove any excess paper, and smooth the edges.

Animal print switch covers

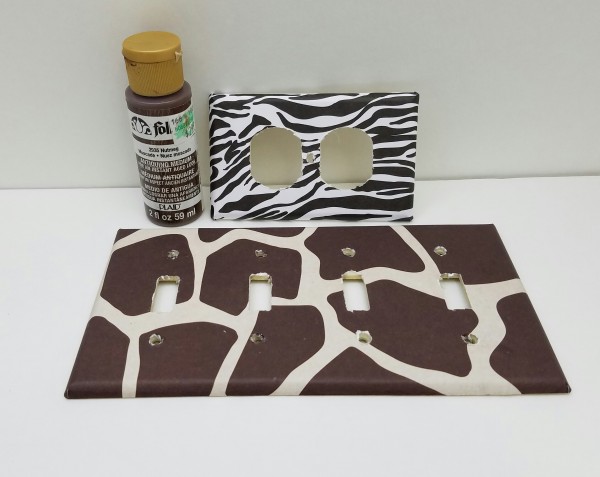
Next I added the antique medium to darken the animal print. Let dry.

Animal print switch covers

Then I brushed mod podge over the tops of each animal print switch cover to seal and protect each cover plate.

Animal print switch covers

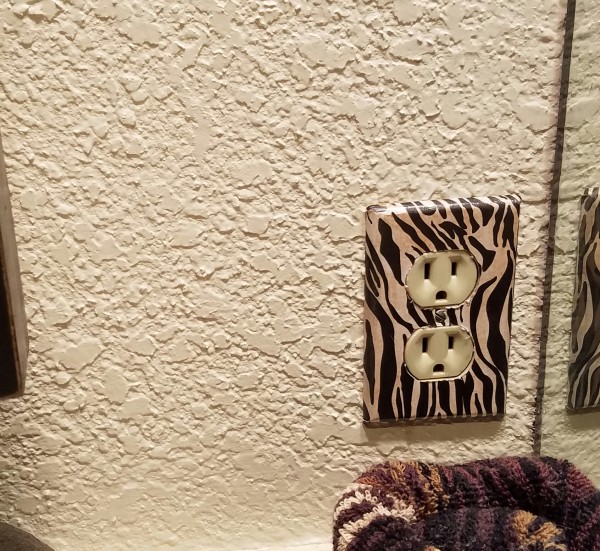
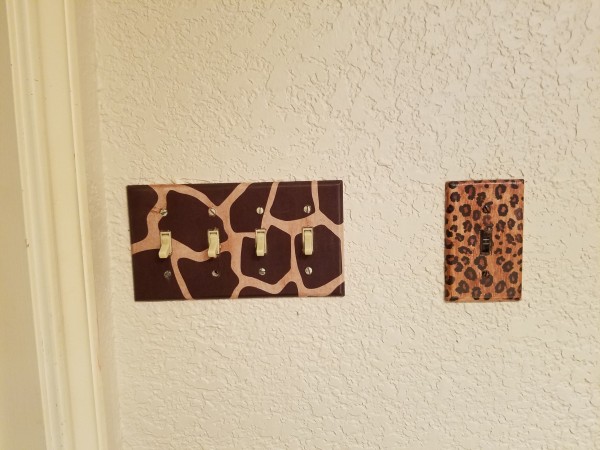
Once dry you can attach the animal print switch plate covers back in place on the wall.

how to make Animal print switch plate covers

That’s all there is to making animal print switch plate covers that will bring a smile to anyone that sees them.

*This post contains affiliate links, if you click on an affiliate link & buy something I may receive a small commission at no extra charge to you. The affiliate money I earn helps pay the expenses to keep this site running. Please read my full advertising disclosure for more info. Thanks so much for your support!*

Supplies Needed For This Project

(includes affiliate links for your convenience)

* Animal print scrapbook paper
* Mod Podge I love my Mod Podge
* Switch plate covers
* Antiquing medium
* Paint brush
* X-Acto knife
* Emery board (these come in really handy for sanding small things)
* Wax paper (I use wax paper under the projects that I’m painting or using Mod Podge on)
* Small cutting board (for cutting out the switch opening, and where the screws go)
* Screwdriver to attach the animal print switch covers in place

If you found this post helpful, please share and pin for later reference.

More Fun Animal Print Projects

Animal print soap dispenser
Diy vintage zebra print block with cross
I was a lamb, now I am a?

how-to-make-an-animal-print-switch-plate-cover

If you enjoyed this post, don't forget to pin it for later!

25 shares
  • Share5
  • Tweet

If you enjoyed this post, would you mind taking the time to:
  • Share, or Pin for later reference.
  • Follow me on Facebook, Twitter, Pinterest
  • Leave a comment
Thank you so much for taking the time to comment. I love hearing from my readers, and appreciate the kind words.

Comments

  1. Mary-the boondocks blog says

    September 19, 2016 at 5:07 pm

    Linda these are so cute. Now you can totally customize all of your switch plates without having to spend a fortune. I love your bold choice of patterns. The tutorial is excellent also.

    Reply
    • Linda @ Mixed Kreations says

      September 24, 2016 at 5:14 pm

      Thank you Mary! I may eventually have all of my switch plates covered. LOL. The fancy switch covers are so expensive, and I just can’t bring myself to pay $20 a piece for all the ones we would need.

      Reply
  2. Sarah Jean says

    September 20, 2016 at 8:39 am

    SO easy! And I love how anyone can tweak this DIY to make it their own style just by changing up the paper.

    Reply
    • Linda @ Mixed Kreations says

      September 24, 2016 at 5:11 pm

      There is so many pretty patterns of scrapbook paper where you can make the switch plates any style that you want. I’m thinking of making one for my craft room. I’m sure I can find something crafty.

      Reply
  3. Michelle says

    September 22, 2016 at 2:26 am

    Love this Linda!!! You really need to do a video shot of the guest bathroom, with all the beautiful things you’ve made for it. Can I come visit, I promise to bring a little bit of Africa with me?

    Reply
    • Linda @ Mixed Kreations says

      September 24, 2016 at 5:08 pm

      I haven’t thought of that. I wonder if I could get decent shots, there’s not very good lighting in there. I will have to give it a shot. Sure you can come visit me anytime. Will you bring me a baby elephant please. 😉

      Reply
  4. Ilka says

    September 22, 2016 at 6:04 am

    This is such a great DIY idea Linda!

    Reply
    • Linda @ Mixed Kreations says

      September 24, 2016 at 5:05 pm

      Thank you Ilka! I like that it is a easy and inexpensive way to dress up plain ole switch plates. Fancy ones are so expensive.

      Reply
  5. Jennifer says

    October 7, 2016 at 1:27 am

    This is also pretty easy-to-do, even my kids can do it. Thanks you so much for sharing another great DIY ideas, Linda!

    Reply
    • Linda @ Mixed Kreations says

      October 7, 2016 at 6:47 am

      Thank you Jennifer! It is very easy, and I bet kids would enjoy decorating their own switch plates. Probably need some help when it comes to cutting the holes for the switch and screws.

      Reply
  6. Sarah - Craft Invaders says

    March 1, 2017 at 3:27 am

    These look so cool Linda, and they would be so easy to customise for any room – brilliant!

    Reply
    • Linda @ Mixed Kreations says

      March 9, 2017 at 4:36 pm

      Thank you Sarah! Yes they would, and I intend to make more just haven’t gotten around to it yet.

      Reply
  7. Diane Price says

    February 21, 2021 at 10:41 pm

    So easy! This looks like something I can also do at home. Love this. Thanks for posting!

    Reply
    • Linda @ Mixed Kreations says

      February 27, 2021 at 6:20 pm

      Hi Diane! I’m glad that you enjoyed the post! It’s most definitely a project that you can do at home. Thanks for stopping by!

      Reply

Trackbacks

  1. How To Make A Shabby Animal Print Valiance - Mixed Kreations says:
    August 9, 2017 at 7:01 am

    […] First cut all your animal print fabric into 18″ strips approximately 1″ […]

    Reply

Leave a Reply Cancel reply

Your email address will not be published. Required fields are marked *

CommentLuv badgeShow more posts

This site uses Akismet to reduce spam. Learn how your comment data is processed.

Thanks for sharing your thoughts and comments! I read and appreciate every single one!

Follow Mixed Kreations

Facebooktwitterpinterestyoutubeinstagram

My Favorites on Amazon

My Amazon Influencer Shop

Homemade Chalk Paint

diy chalk paint

How to Make Rusty Cans

how to make rusty cans

How to Make a Flag From a Wood Shutter

how to make a 2 sided american flag

Easter Egg Jar

How to make a Easter egg jar

Diy Texas Tile Coasters

Texas Tile Coasters

Update a Thrift Store Find

How to Update a Hanging Box in 4 easy steps

Categories

By Kelli & Crystal From Learn To Blog Hangouts

#LearntoBlog Hangouts

Dominate Course

LearntoBlog
Featured on Hometalk.com
Rakuten Affiliate Network Welcome Program
Grow and Make

Dollar Tree

Creative Fabrica Font Bundles

Font Banner - Free Fonts

Featured At

Featured At

Mixed Kreations featured in Country sampler

Featured at

mixed kreations is featured in Bella Crafts online magazine
The Pin Junkie

Canva Photo Editing

Amazon Affiliates

I am a participant in the Amazon Services LLC Associates Program, an affiliate advertising program designed to provide a means for sites to earn advertising fees by advertising and linking to Amazon.com.

Disclosures Statement

This policy is valid from 19 July 2013 This blog is a personal blog written and edited by me. For questions about this blog, please contact Linda @ ldkeesee@mixedkreations.com. This blog accepts forms of cash advertising, sponsorship, paid insertions or other forms of compensation. The compensation received will never influence the content, topics or posts made in this blog. All advertising is in the form of advertisements generated by a third party ad network. Those advertisements will be identified as paid advertisements. The owner(s) of this blog is compensated to provide opinion on products, services, websites and various other topics. Even though the owner(s) of this blog receives compensation for our posts or advertisements, we always give our honest opinions, findings, beliefs, or experiences on those topics or products. The views and opinions expressed on this blog are purely the bloggers' own. Any product claim, statistic, quote or other representation about a product or service should be verified with the manufacturer, provider or party in question. This blog does not contain any content which might present a conflict of interest. To get your own policy, go to http://www.disclosurepolicy.org

Copyright © 2023 · Modern Blogger Pro Theme By, Pretty Darn Cute Design