Mixed Kreations

The Creative Life & Journey Of A DIY'ER

  • Home
  • Diy Projects
    • Handmade Cross Projects
    • Holiday & Seasonal Projects
    • Mason Jars
    • Fun Upcyled Shutters & Spindles
    • Texas Projects
    • Upcycled Cans
    • Wood Projects
    • Jewelry Tutorials
  • Quick and Easy Recipes
  • Shop Mixed Kreations
    • Etsy Shop
    • Mixed Kreations Amazon Influencer
  • DISCLOSURES STATEMENT & PRIVACY POLICY
  • About Me
  • Recommendations
You are here: Home / DIY/Craft Projects / 3 Snowmen in a Can

3 Snowmen in a Can

December 8, 2022 By: Linda @ Mixed Kreationscomment

If you enjoyed this post, don't forget to pin it for later!

0 shares
  • Share
  • Tweet

Hi all! I’ve been lucky for the last few years and haven’t been sick. But last week the flu got ahold of me and did not want to let go. Just when I would get to feeling better the very next day, I would have a relapse. So I am rushing around today trying to get my 3 snowmen in a can project ready to share tomorrow. This has been the longest bout of flu that I have ever had. Today makes the 8th day with two relapses, and I am hoping today I am finally on the mend to recovery. I’m ready to get back to my creating!

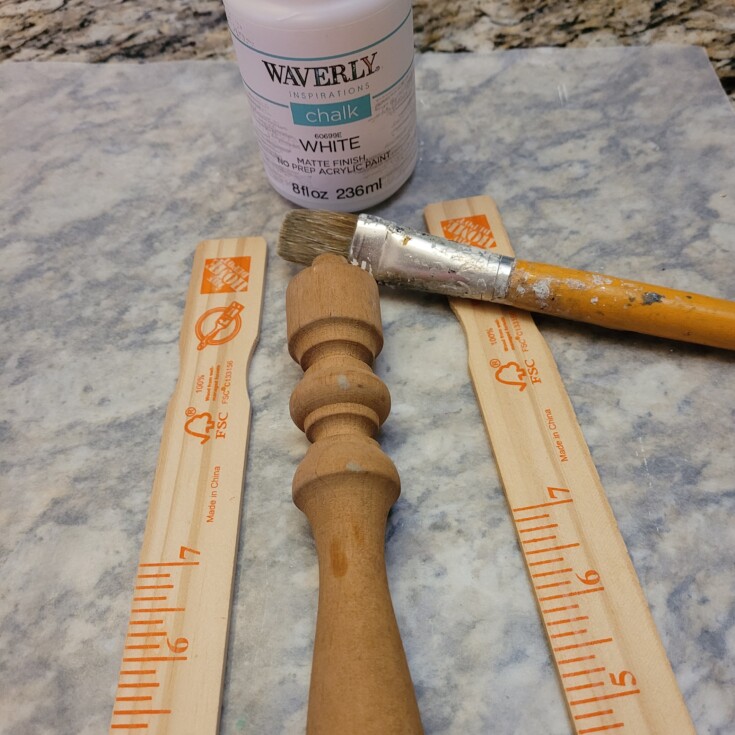
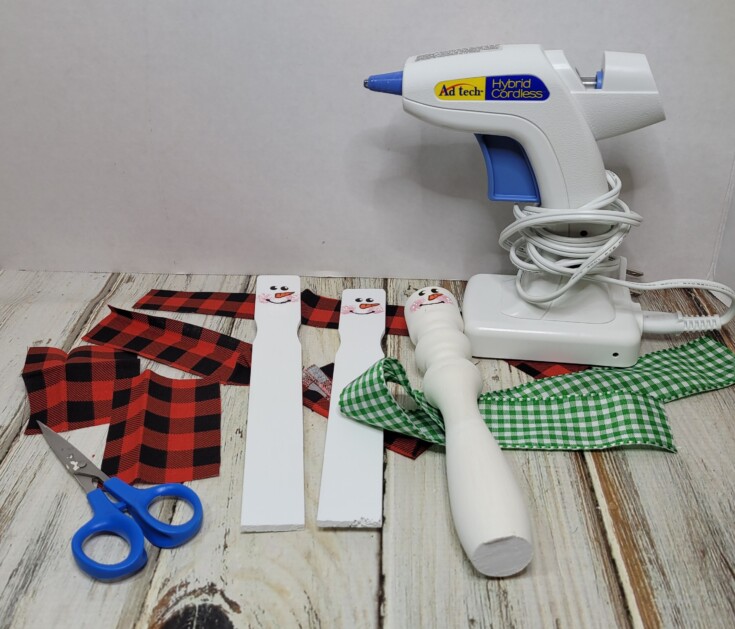
For this project you will need a tin can, one wood spindle, and two paint stir sticks. You can find the complete supply list at the end of the post. Let’s get started!

3 snowmen in a tin can

***This post contains affiliate links… We are a participant in the Amazon Services LLC Associates Program, and affiliate advertising program designed to provide a means for us to earn fees by linking to Amazon.com and affiliated sites at no extra charge to you. Please read my full advertising disclosure for more info. Thanks so much for your support!***

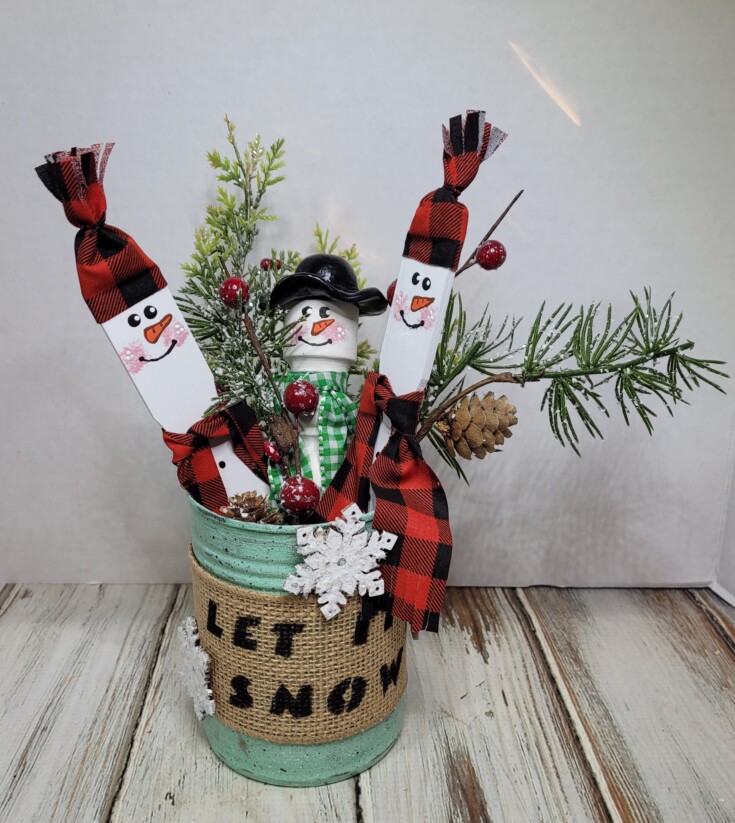
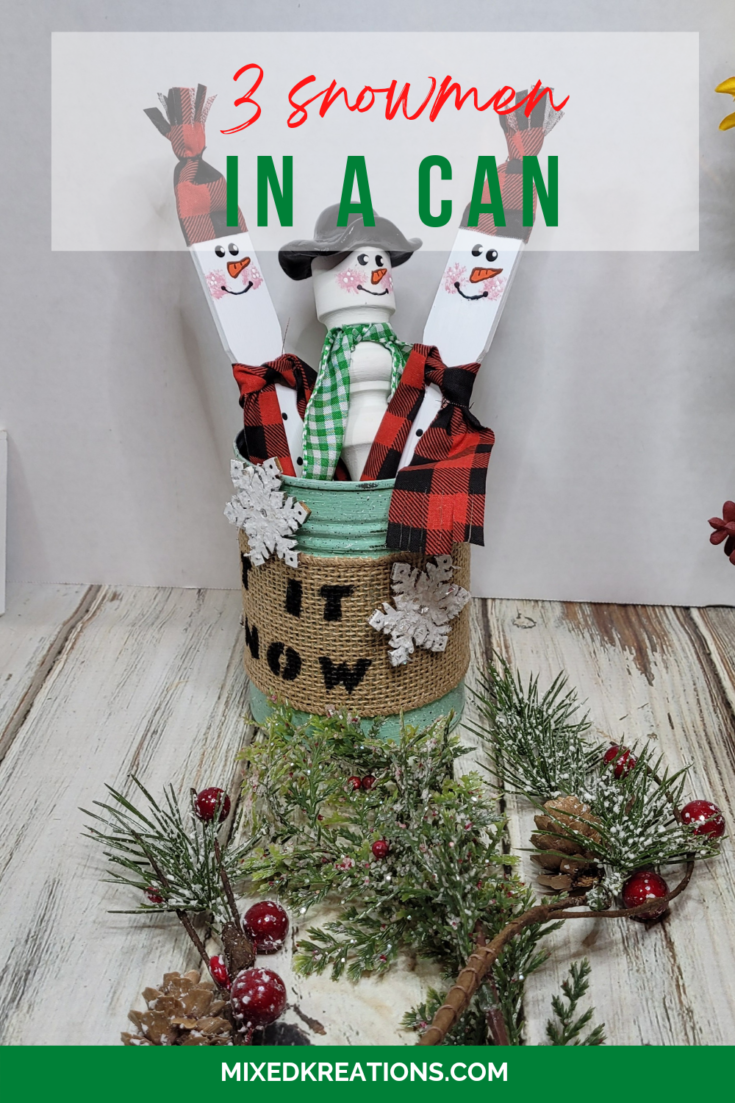
Diy Snowmen in a Can

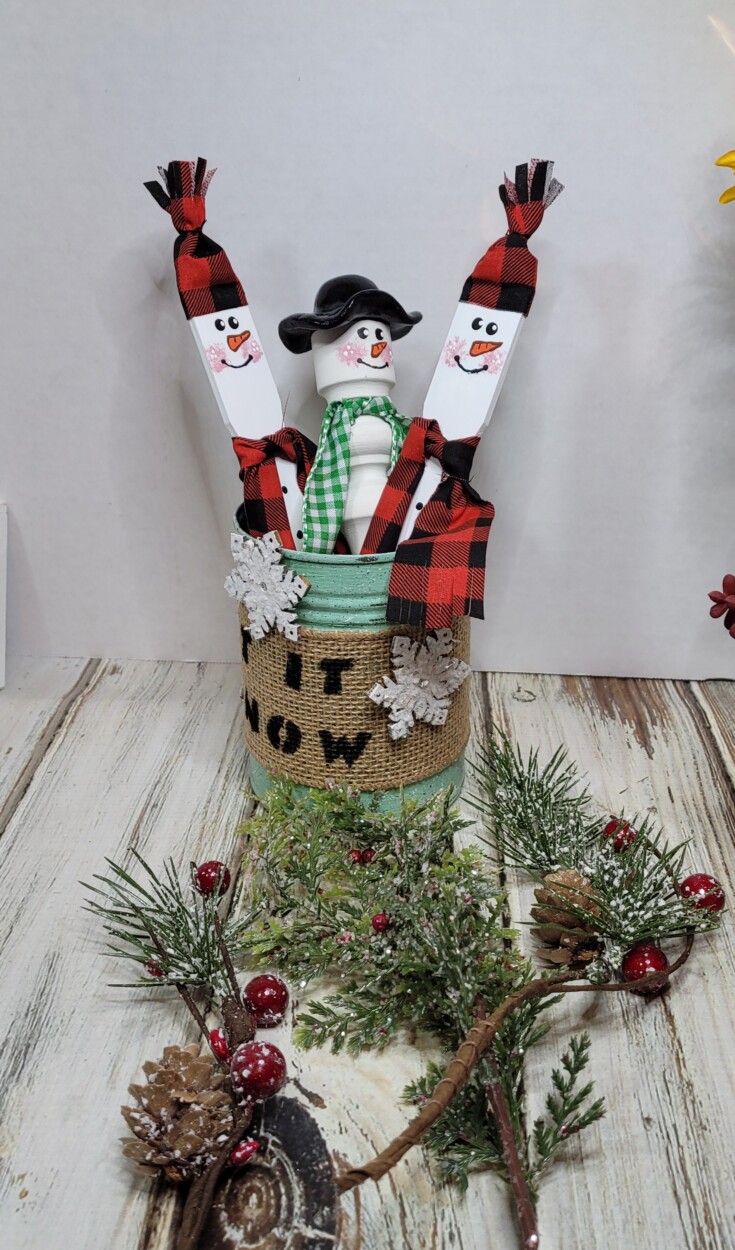
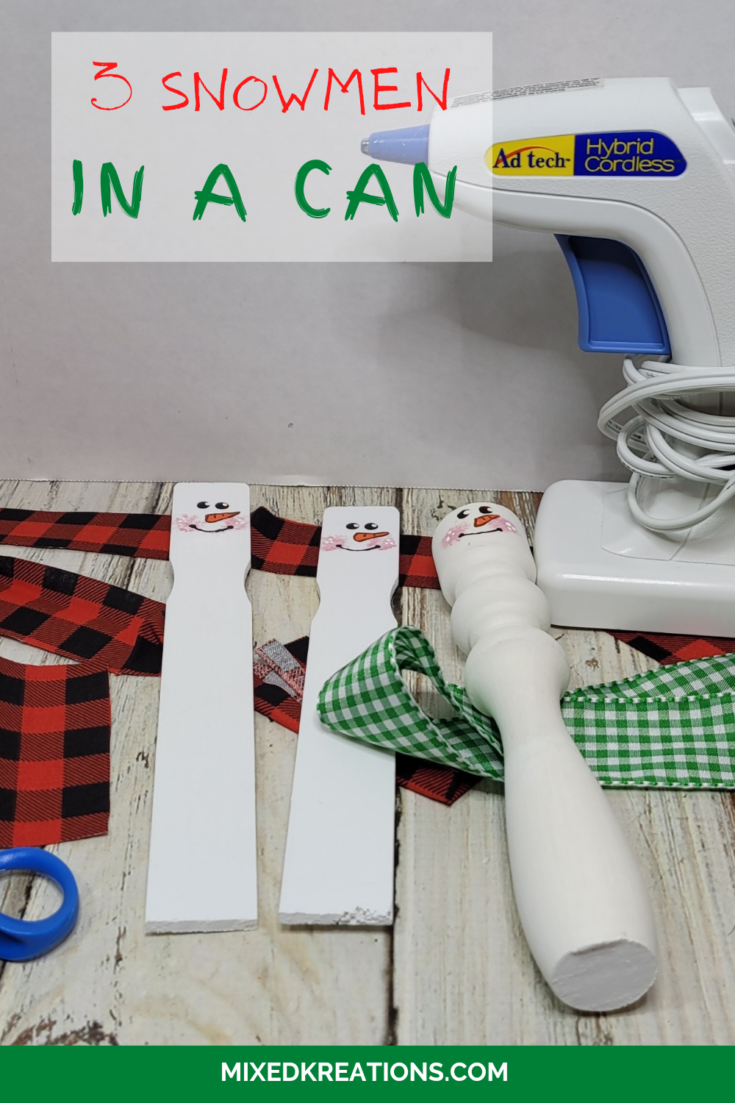
The wood spindle was cut down to 7” and the two stir sticks were cut to 8” using a miter saw. Then given two coats of white chalk paint to each.

Paint stick and spindle snowmen

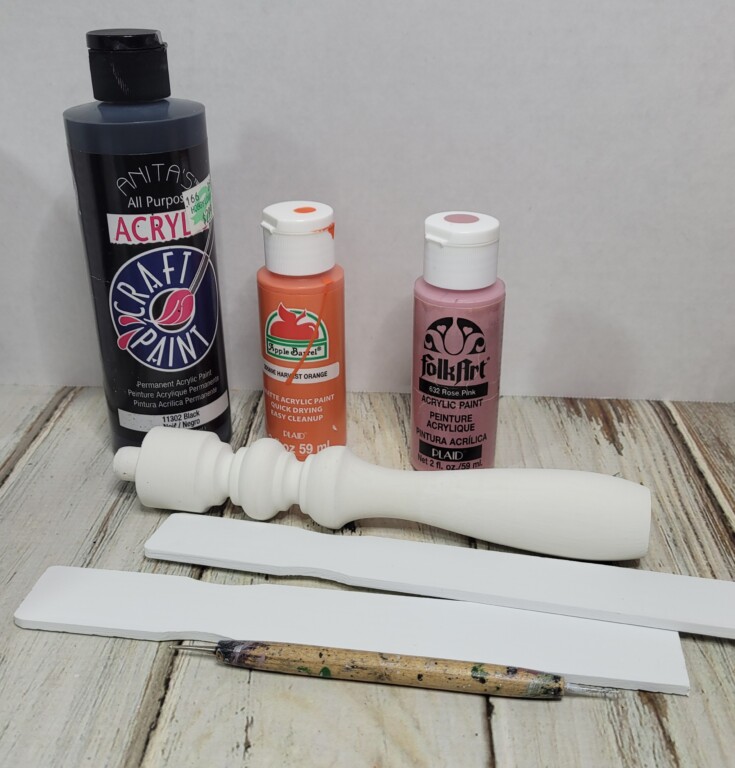
Next, I painted the faces on each of the 3 snowmen in a can. Orange for the nose outlined with burnt sienna, rose pink for the cheeks, and black for the eyes and mouth. The white dots in the eyes and on the cheeks were added using a stylus tool.

Diy snowmen

Diy snowmen

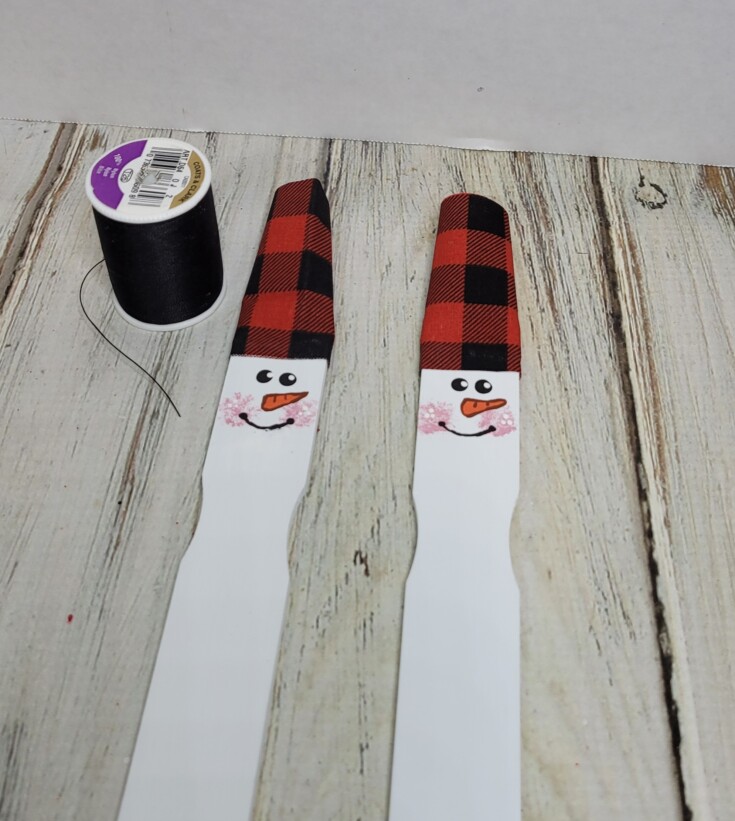
For the stir stick snowmen sock hats I hot glued some plaid fabric on the top of their heads, added some stuffing, then tied them with some black thread and cut the tops to resemble fringe.

Diy snowmen

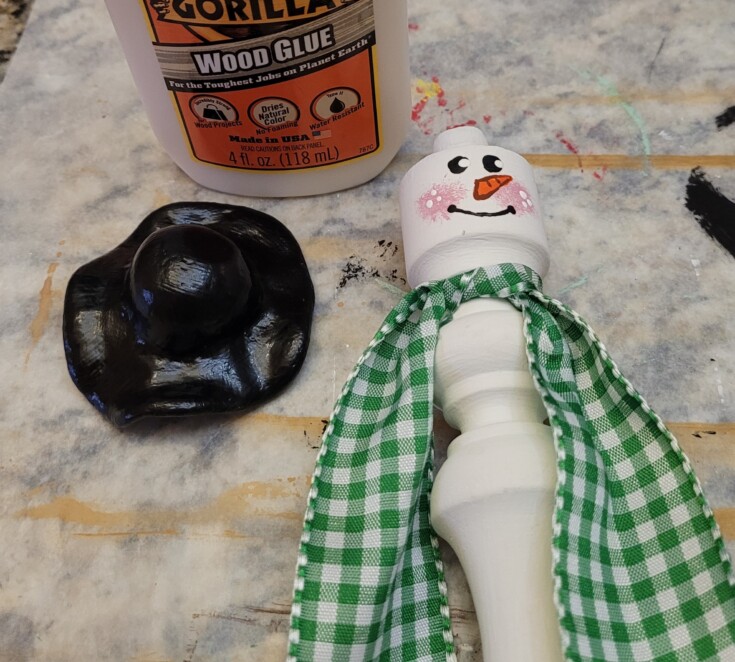
The spindle snowman’s hat was made from air-dry clay like last weeks wood spindle snowman. Once the hat was dry it received two coats of black acrylic paint and two coats of Mod Podge.

Each of the 3 snowmen in a can got a plaid scarf around their necks. The ends were trimmed to resemble fringe.

How to make wood snowmen

Wood glue was used to glue his hat on.

snowmen in a can diy

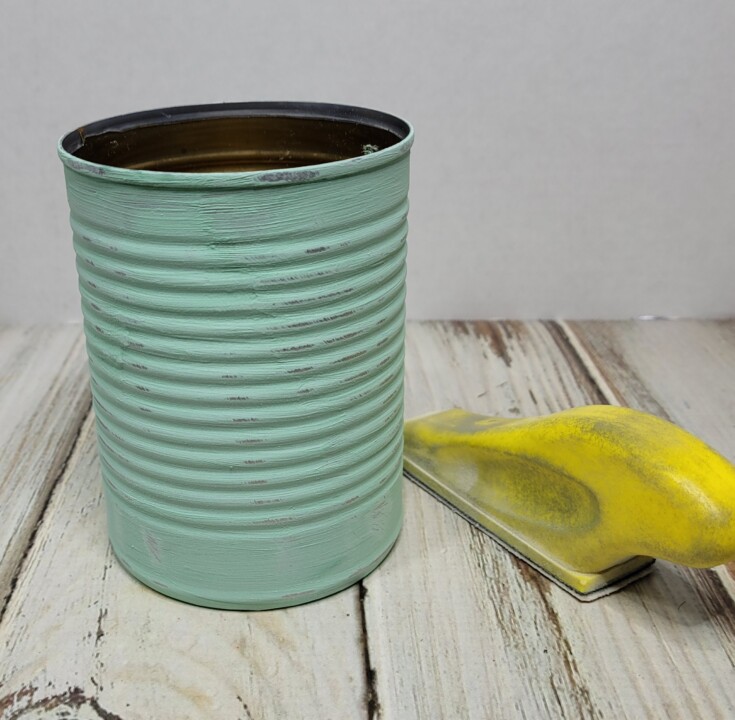
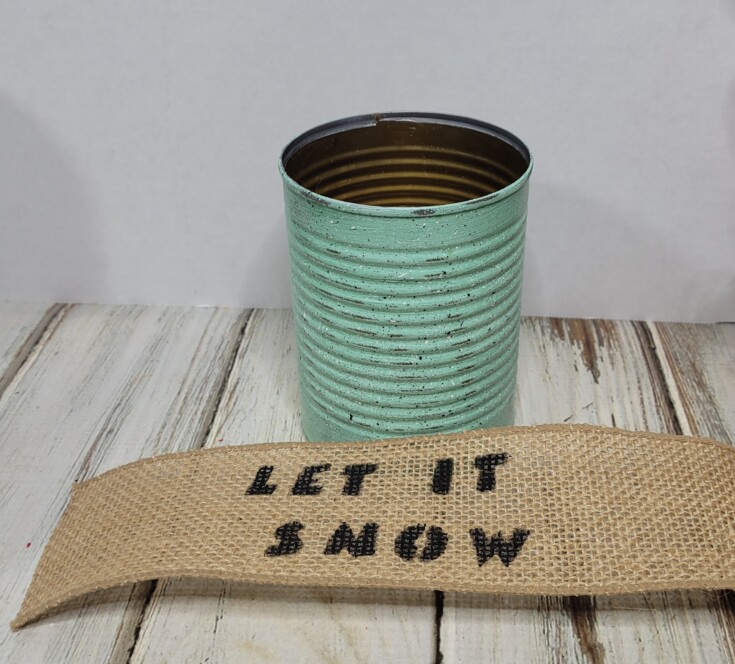
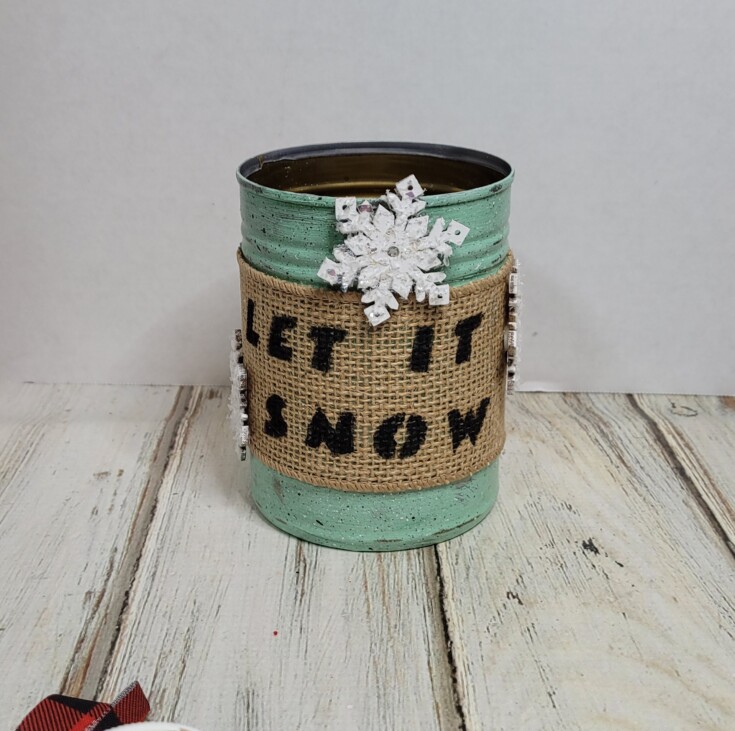
For the can I grabbed some white chalk paint and green acrylic paint so that I could mix up a pretty light green paint color for the can. I used chalk paint because it adheres to tin cans easily with any prep work. I gave the can two coats of the paint that I mixed up. Once dry I distressed the can with my nifty finger sander.

Diy snowmen

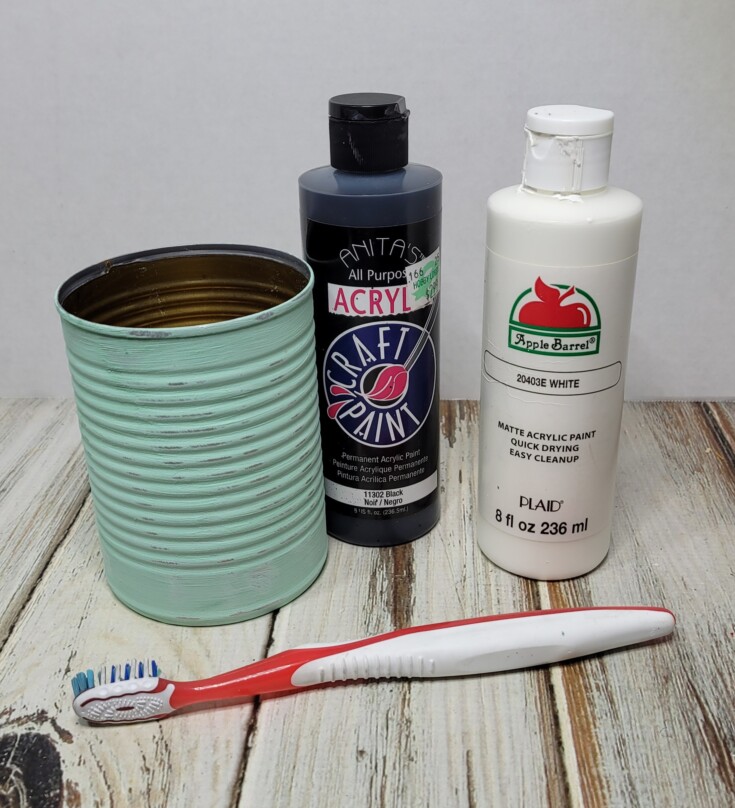
Afterwards I used black and white acrylic paint and an old tooth brush I splattered the can then gave it two coats of Mod Podge.

Splattered can

While the can was drying, I grabbed some burlap ribbon that was cut just long enough to go all the way around the can and stenciled the words “Let it snow” on the ribbon.

Painted can with snowmen

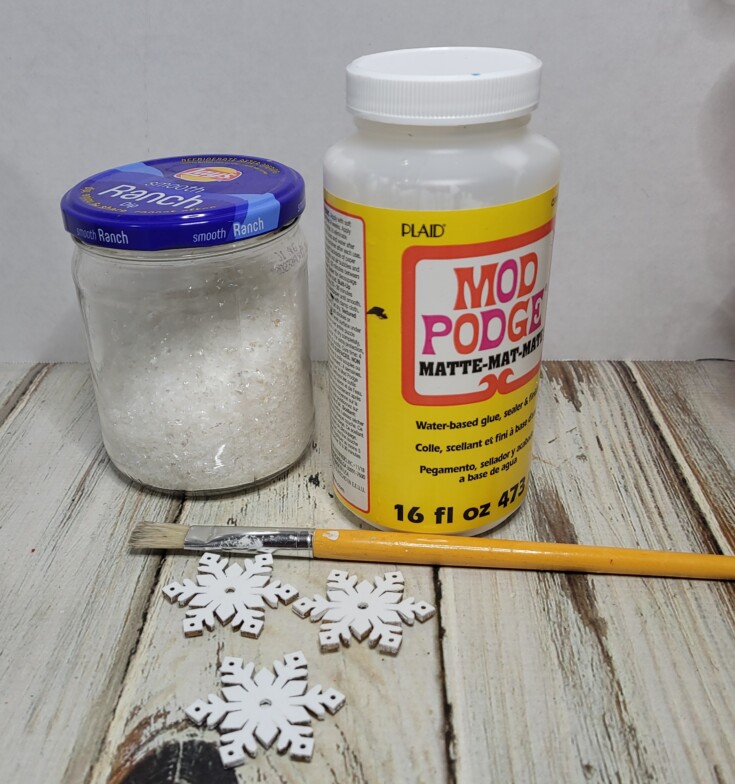
I found some wood snowflakes that I decided to add to the can so I added a light coat of Mod Podge then sprinkled some fake snowflakes over them to give them some sparkle.

Wood snow flakes

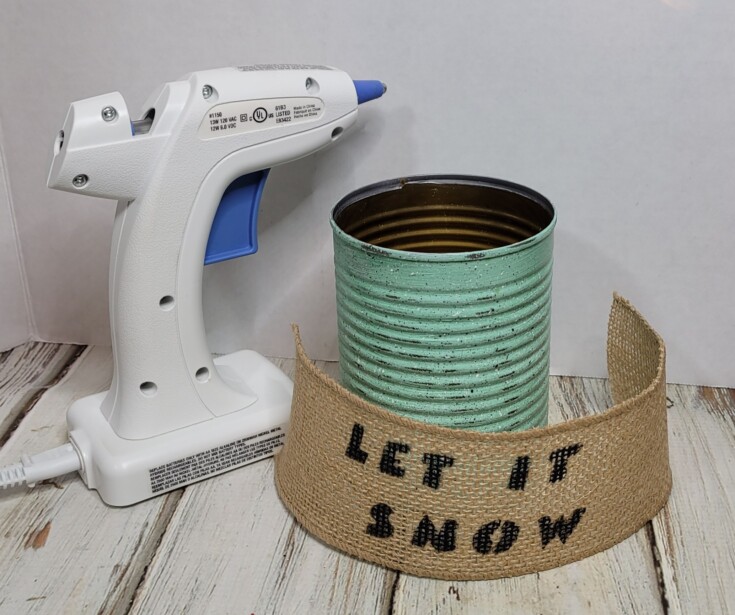
Next the stenciled ribbon was attached to the can using hot glue.

Diy snowmen

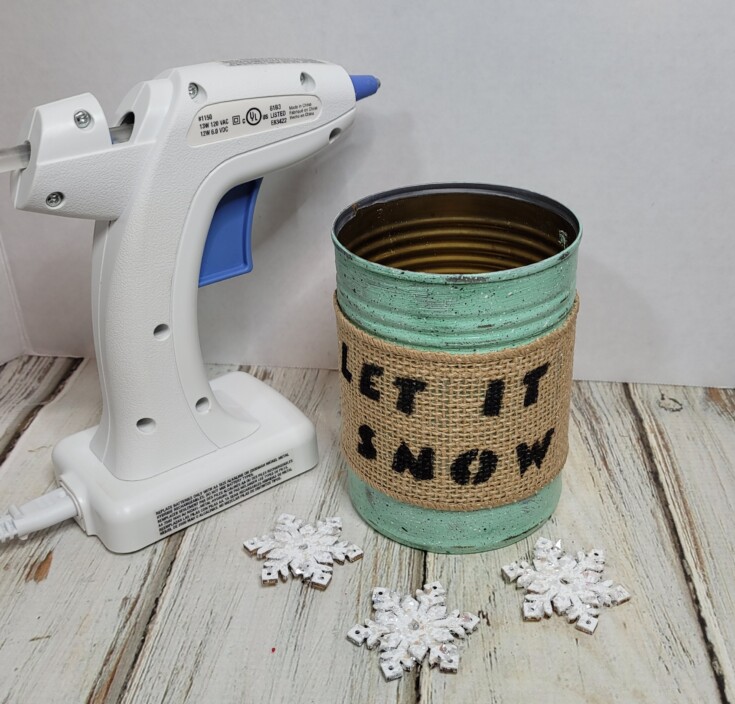
The snowflakes were attached to the can with hot glue as well.

Diy snowmen

Diy snowmen

Time to add the snowmen to their can with a few sprigs of Christmas greenery.

3 snowmen in a can

snowmen in a can

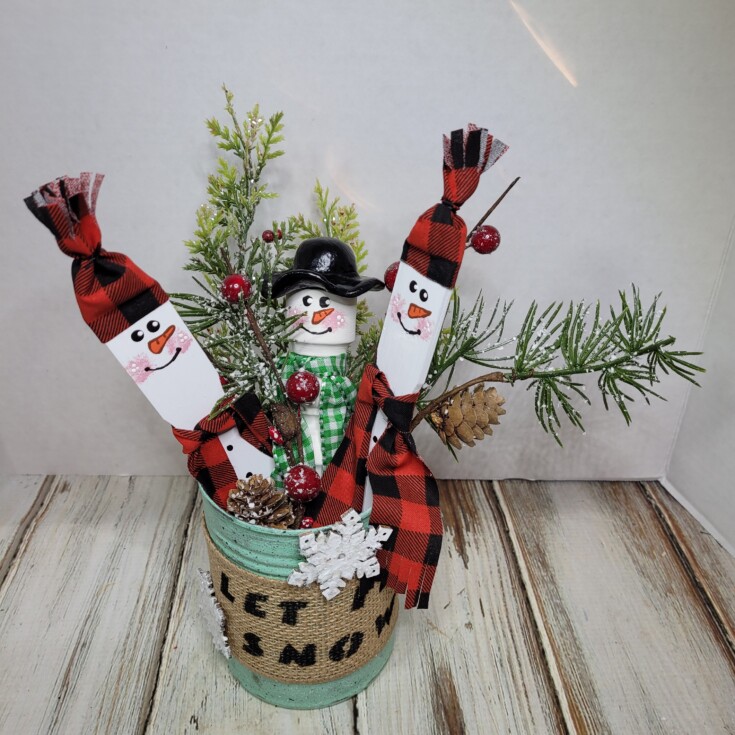
And that’s it for these 3 snowmen in a can! I am absolutely loving how they turned out!

Supplies for the Snowmen in a Can

Wood spindle
Tin can
Burlap ribbon
2 paint stir sticks
Christmas greenery sprigs
Stencil “Let it snow”
Plaid material
Black thread
3 wood snowflakes
Fake snow
Wood glue
White chalk paint
Orange, burnt sienna, black, green, rose pink, and white acrylic paint
Air-dry clay
Scissors
Finger sander
Paint brushes
Old tooth brush
Stylus tool
Miter saw

More Fun Christmas Projects!

Christmas coasters – Red Farm Truck
Vintage funnel tree
Mini scrap wood village
Santa suits

Snowmen in a can how to

Snowmen in a tin can how to

If you enjoyed this post, don't forget to pin it for later!

0 shares
  • Share
  • Tweet

If you enjoyed this post, would you mind taking the time to:
  • Share, or Pin for later reference.
  • Follow me on Facebook, Twitter, Pinterest
  • Leave a comment
Thank you so much for taking the time to comment. I love hearing from my readers, and appreciate the kind words.

Leave a Reply Cancel reply

Your email address will not be published. Required fields are marked *

CommentLuv badgeShow more posts

This site uses Akismet to reduce spam. Learn how your comment data is processed.

Thanks for sharing your thoughts and comments! I read and appreciate every single one!

Follow Mixed Kreations

Facebooktwitterpinterestyoutubeinstagram

My Favorites on Amazon

My Amazon Influencer Shop

Homemade Chalk Paint

diy chalk paint

How to Make Rusty Cans

how to make rusty cans

How to Make a Flag From a Wood Shutter

how to make a 2 sided american flag

Easter Egg Jar

How to make a Easter egg jar

Diy Texas Tile Coasters

Texas Tile Coasters

Update a Thrift Store Find

How to Update a Hanging Box in 4 easy steps

Categories

By Kelli & Crystal From Learn To Blog Hangouts

#LearntoBlog Hangouts

Dominate Course

LearntoBlog
Featured on Hometalk.com
Rakuten Affiliate Network Welcome Program
Grow and Make

Dollar Tree

Creative Fabrica Font Bundles

Font Banner - Free Fonts

Featured At

Featured At

Mixed Kreations featured in Country sampler

Featured at

mixed kreations is featured in Bella Crafts online magazine
The Pin Junkie

Canva Photo Editing

Amazon Affiliates

I am a participant in the Amazon Services LLC Associates Program, an affiliate advertising program designed to provide a means for sites to earn advertising fees by advertising and linking to Amazon.com.

Disclosures Statement

This policy is valid from 19 July 2013 This blog is a personal blog written and edited by me. For questions about this blog, please contact Linda @ ldkeesee@mixedkreations.com. This blog accepts forms of cash advertising, sponsorship, paid insertions or other forms of compensation. The compensation received will never influence the content, topics or posts made in this blog. All advertising is in the form of advertisements generated by a third party ad network. Those advertisements will be identified as paid advertisements. The owner(s) of this blog is compensated to provide opinion on products, services, websites and various other topics. Even though the owner(s) of this blog receives compensation for our posts or advertisements, we always give our honest opinions, findings, beliefs, or experiences on those topics or products. The views and opinions expressed on this blog are purely the bloggers' own. Any product claim, statistic, quote or other representation about a product or service should be verified with the manufacturer, provider or party in question. This blog does not contain any content which might present a conflict of interest. To get your own policy, go to http://www.disclosurepolicy.org

Copyright © 2023 · Modern Blogger Pro Theme By, Pretty Darn Cute Design